> ## Documentation Index
> Fetch the complete documentation index at: https://docs.phinite.ai/llms.txt
> Use this file to discover all available pages before exploring further.
# Agent Graph Publishing & Versioning
> Deploy flows safely with comprehensive version control, access management, and debugging capabilities.
## Publishing overview
Agent Graph publishing in Phinite provides enterprise-grade deployment capabilities with full version control, access management, and observability. Understanding the publishing process is crucial for maintaining stable, secure, and auditable workflows.
### Publishing workflow
```mermaid theme={null}
graph TD
A[Draft Agent Graph] --> B[Save Agent Graph]
B --> C[Validation Check]
C --> D{Validation Pass?}
D -->|No| E[Fix Issues]
E --> C
D -->|Yes| F[Add Version Notes]
F --> G[Publish to Environment]
G --> H[Version Created]
H --> I[Deployment Complete]
```
## Access control and permissions
Publishing flows requires "Admin" or "SuperAdmin" role. Users with "Developer" role can save flows but cannot publish them to production environments.
### Role-based publishing permissions
| Role | Can Save Agent Graphs | Can Publish to Dev | Can Publish to UAT | Can Publish to Prod |
| -------------- | --------------------- | ------------------ | ------------------ | ------------------- |
| **SuperAdmin** | ✅ | ✅ | ✅ | ✅ |
| **Admin** | ✅ | ✅ | ✅ | ✅ |
| **Developer** | ✅ | ✅ | ❌ | ❌ |
| **Tester** | ❌ | ❌ | ❌ | ❌ |
| **Viewer** | ❌ | ❌ | ❌ | ❌ |
### Environment-specific access
* **Development**: All users with "Developer" role or higher
* **UAT**: Requires "Admin" role for publishing
* **Production**: Requires "Admin" or "SuperAdmin" role with additional approval workflows
## Pre-publishing checklist
### Agent Graph validation requirements
* Agent Graph is saved successfully
* All required node fields are filled
* Agent prompts are complete and tested
* RAG sources are properly connected
* Tool integrations are configured
* Variables are properly mapped
* Conditional edges have valid logic
* Agent Graph has clear Start and End nodes
* No orphaned nodes or disconnected components
### Common validation failures
**Error**: "Please fill all required details for the following nodes: agent, tool"
**Debugging steps**:
1. Check each node in the Inspector panel
2. Verify all required fields are populated
3. Look for red validation indicators
**Resolution**: Fill all required fields and re-validate
**Error**: "Agent Graph contains invalid connections or orphaned nodes"
**Debugging steps**:
1. Check for nodes without proper connections
2. Verify Start node has outgoing connections (Max one)
3. Ensure End nodes have incoming connections
4. Look for disconnected nodes in the canvas (Except the child nodes)
**Resolution**: Connect all nodes properly and ensure graph integrity
**Error**: "Tool integration failed validation"
**Debugging steps**:
1. Verify API keys and credentials
2. Review tool parameter mapping
**Resolution**: Fix tool configuration and authentication
## Publishing process
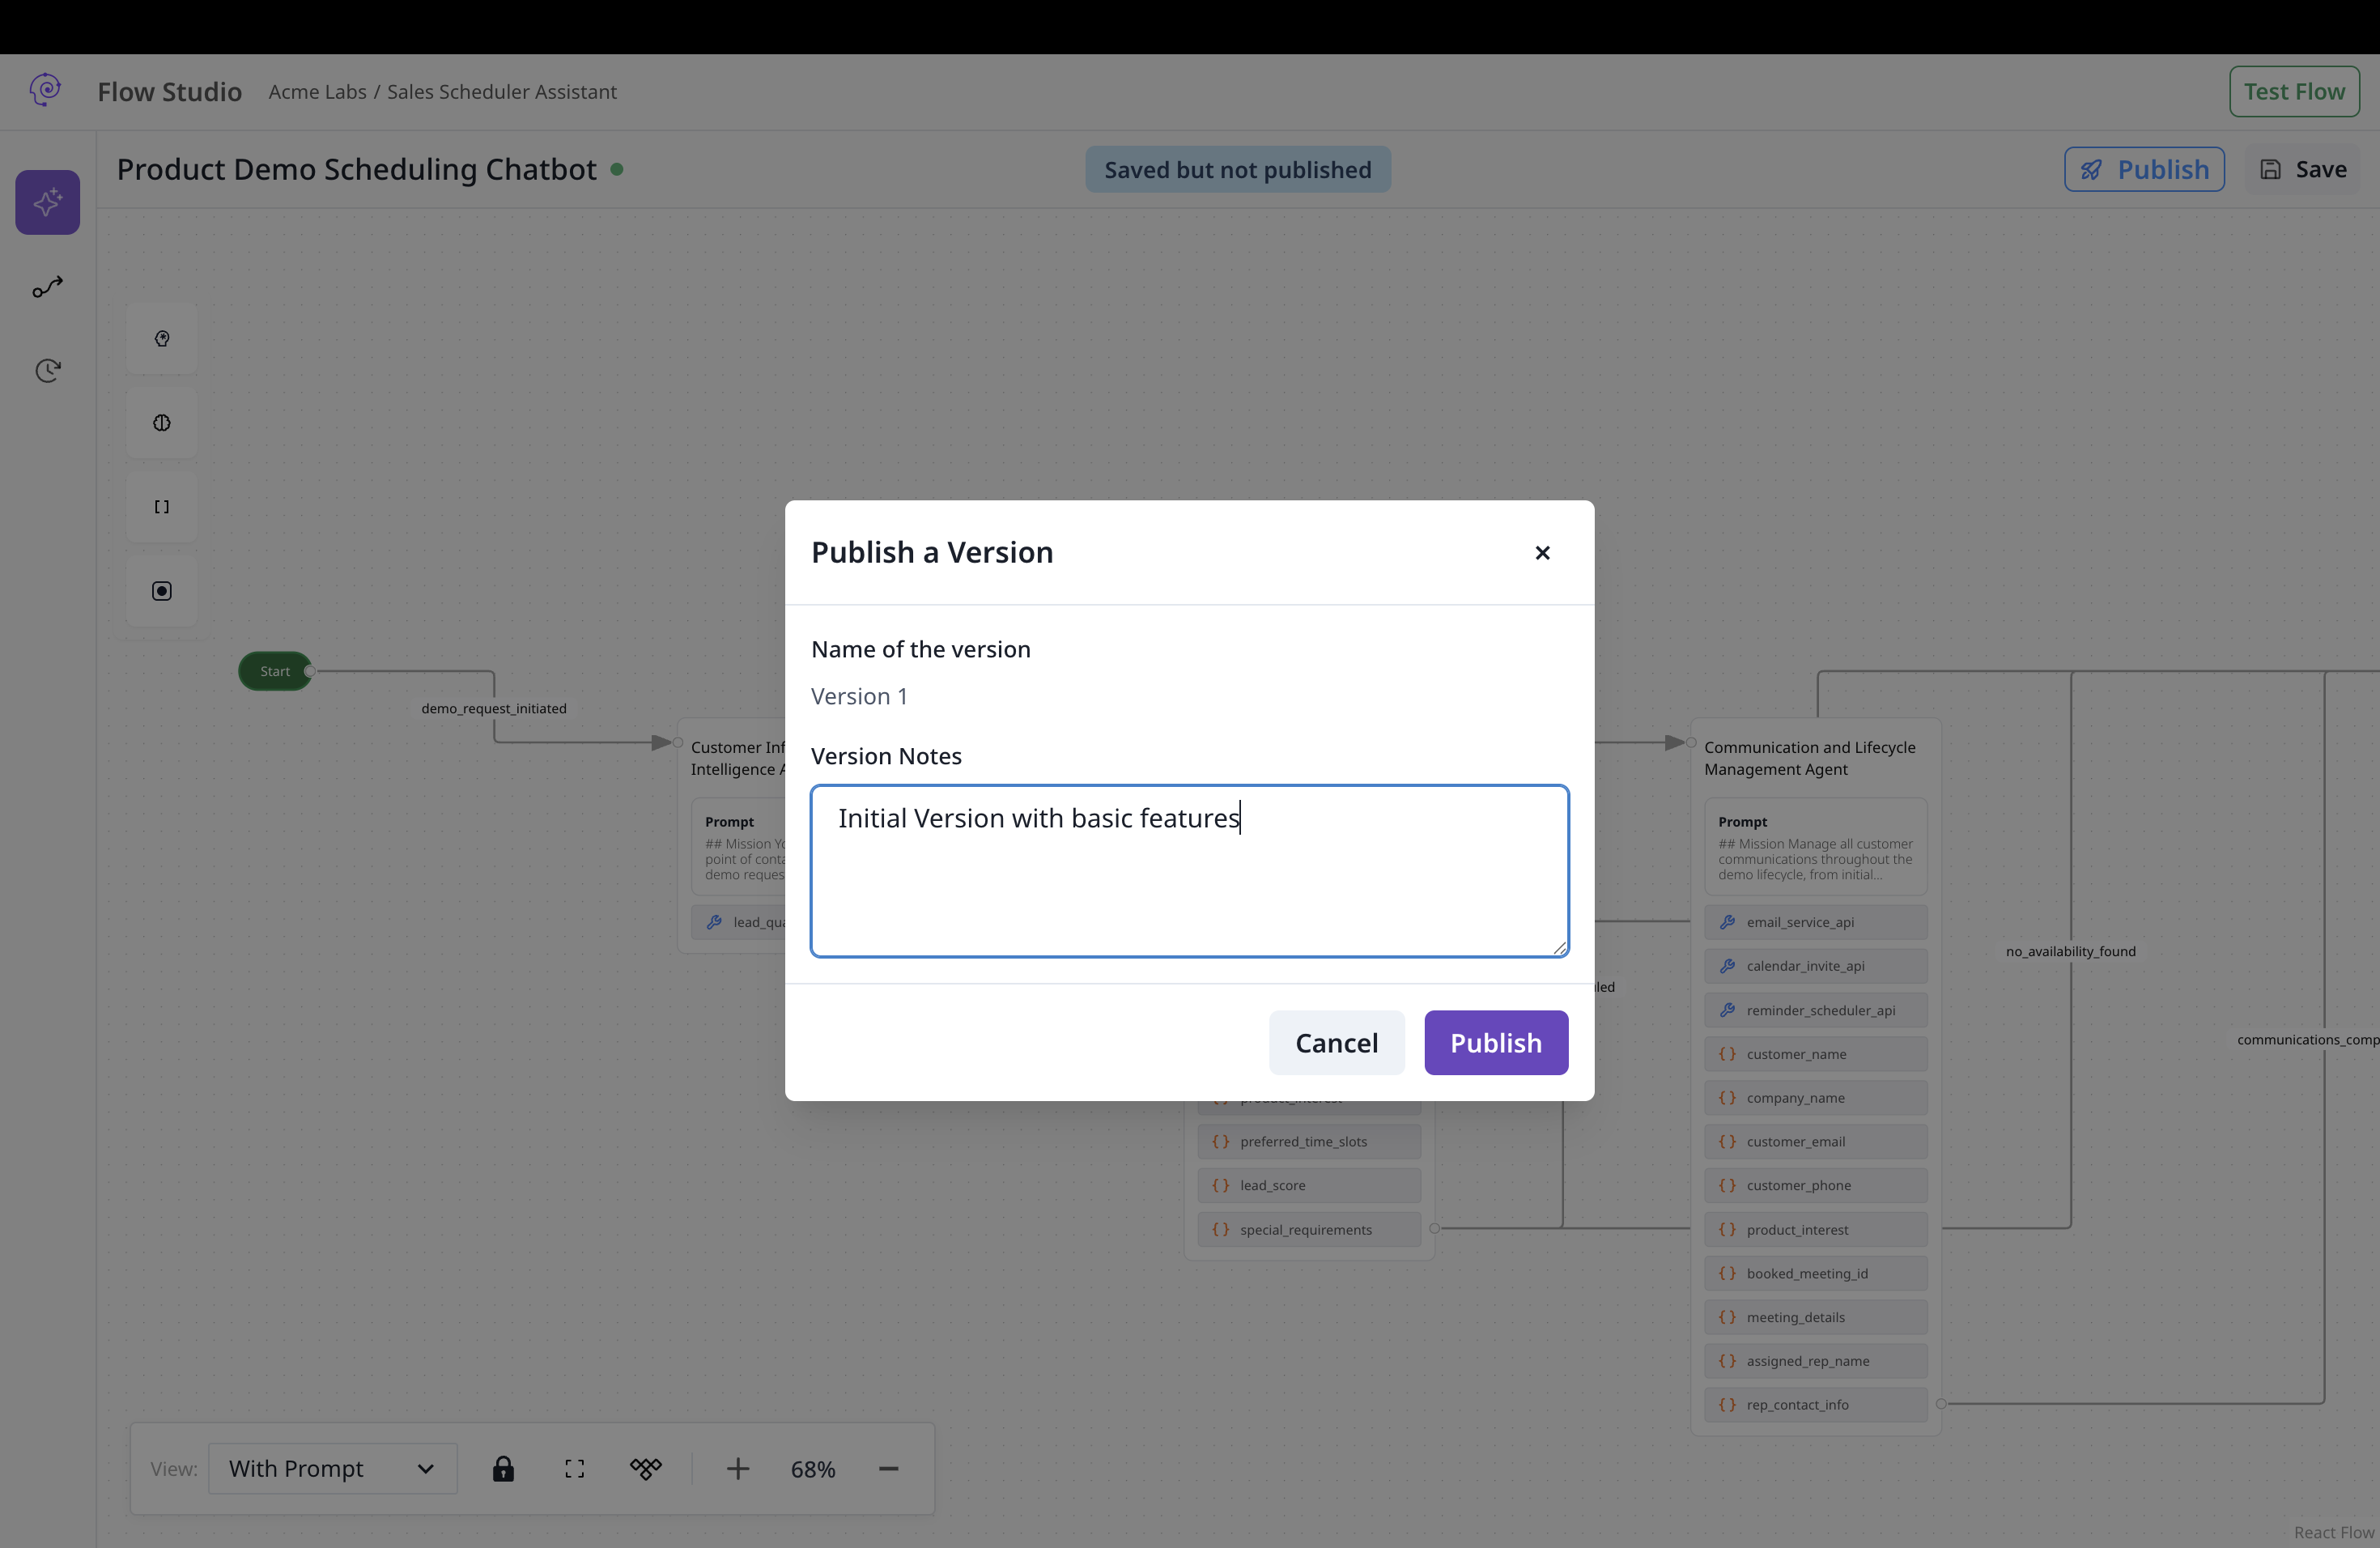 ### Step-by-step publishing
Click "Save" in the studio header to persist your changes.
You should see a success message confirming the flow is saved.
The system automatically validates your flow before publishing.
If validation fails, you'll see specific error messages indicating what needs to be fixed.
Provide a clear description of changes in this version.
**Good version notes**:
```markdown theme={null}
Version 2.1.0 - Customer Service Agent Graph
- Added RAG integration for policy knowledge
- Improved error handling for payment failures
- Updated email templates for better customer experience
- Fixed issue with order lookup timeout
```
**Poor version notes**:
```markdown theme={null}
Updated stuff
```
Choose the appropriate environment for deployment.
Production deployments may require additional approval workflows depending on your organization's policies.
Review all settings and confirm the publication.
You should see a success message and the new version in the version history.
## Version management
### Version history interface
The version history panel provides comprehensive version management:
* **Version list**: View all published versions with timestamps and notes
* **Version details**: Inspect specific version configurations
* **Copy to draft**: Create a new draft based on any published version
* **Environment status**: See which environments each version is deployed to
### Version numbering
Phinite automatically manages version numbers:
* **First published version**: Starts at version 1
* **Subsequent versions**: Incrementally numbered (2, 3, 4, etc.)
* **Draft versions**: Not numbered until published (default 0)
* **Version notes**: Required for all published versions
### Copying versions to draft
Click "Version History" in the studio sidebar.
Choose the version you want to copy from the list.
Click "Copy to Draft" and confirm the action.
Make your changes and publish as a new version.
## Post-publishing monitoring
### Build verification
Verify the agent graph is connected to target build and build is connected to the desired environment.
Run test scenarios to ensure the flow works as expected.
Use [Observability](/observability/overview) tools to track flow performance.
Check [execution logs](/observability/logs) for any issues or errors.
### Performance monitoring
* **Execution success rate**: Track how often flows complete successfully
* **Response times**: Monitor flow execution duration
* **Error rates**: Identify common failure points. Work on prompt or changing models.
* **Resource usage**: Track token consumption and API calls
## Best practices
### Version management
* **Descriptive notes**: Always provide clear, actionable version descriptions
* **Incremental changes**: Make small, focused changes rather than large overhauls
* **Testing**: Thoroughly test flows before publishing to production
* **Rollback plan**: Keep previous versions available for quick rollback
### Security considerations
* **Access control**: Regularly review who has publishing permissions
* **Environment isolation**: Maintain strict separation between environments
* **Audit trails**: Monitor all publishing activities for compliance
* **Secret management**: Ensure sensitive data is properly secured
### Performance optimization
* **Efficient flows**: Design flows for optimal performance and resource usage
* **Monitoring**: Set up alerts for performance degradation
* **Scaling**: Plan for increased load and usage patterns
* **Optimization**: Continuously optimize based on performance data
## Expose as an A2A agent (Agent Registry)
After you publish an agent graph, you can register it in the **[Agent Registry](/agent-registry/overview)** so other systems and agents can call it over the **A2A protocol**.
Complete validation and publish at least one version to your target environment. Unpublished graphs cannot be exposed.
In Graph Studio (local/dev environments), click **Configure Agent** in the canvas header, then **Create New Build** in the Expose modal.
Fill in Agent Build Config, optional export settings, and the **Agent Card** (skills, tags, visibility). Submit with **Attach Agent Card**.
New builds start as **test**. Promote to **live** from **[Agent Cards](/agent-registry/agent-cards)** when production routing is approved.
Full wizard details: **[Expose your agent graph](/agent-registry/expose-your-flow)**. Hosted URL patterns: **[Endpoints & lifecycle](/agent-registry/endpoints-and-lifecycle)**.
## Integration with other components
### Assistant integration
* [**Conversational Assistants**](/assistants/conversational): Deploy flows for chat and voice interactions
* [**Email Assistants**](/assistants/email): Publish flows for email automation
* [**Autonomous Assistants**](/assistants/autonomous): Deploy background automation flows
### Observability integration
* [**Execution Logs**](/observability/logs): Monitor published flow performance
* [**Usage Metrics**](/observability/usage-metrics): Track flow usage and performance
* [**Error Tracking**](/support/error-codes): Identify and resolve issues
### Environment management
* [**Build Configuration**](/builds/configuration): Configure deployment settings
* [**Lifecycle**](/builds/lifecycle): Recommended testing and deployment flow
### Step-by-step publishing
Click "Save" in the studio header to persist your changes.
You should see a success message confirming the flow is saved.
The system automatically validates your flow before publishing.
If validation fails, you'll see specific error messages indicating what needs to be fixed.
Provide a clear description of changes in this version.
**Good version notes**:
```markdown theme={null}
Version 2.1.0 - Customer Service Agent Graph
- Added RAG integration for policy knowledge
- Improved error handling for payment failures
- Updated email templates for better customer experience
- Fixed issue with order lookup timeout
```
**Poor version notes**:
```markdown theme={null}
Updated stuff
```
Choose the appropriate environment for deployment.
Production deployments may require additional approval workflows depending on your organization's policies.
Review all settings and confirm the publication.
You should see a success message and the new version in the version history.
## Version management
### Version history interface
The version history panel provides comprehensive version management:
* **Version list**: View all published versions with timestamps and notes
* **Version details**: Inspect specific version configurations
* **Copy to draft**: Create a new draft based on any published version
* **Environment status**: See which environments each version is deployed to
### Version numbering
Phinite automatically manages version numbers:
* **First published version**: Starts at version 1
* **Subsequent versions**: Incrementally numbered (2, 3, 4, etc.)
* **Draft versions**: Not numbered until published (default 0)
* **Version notes**: Required for all published versions
### Copying versions to draft
Click "Version History" in the studio sidebar.
Choose the version you want to copy from the list.
Click "Copy to Draft" and confirm the action.
Make your changes and publish as a new version.
## Post-publishing monitoring
### Build verification
Verify the agent graph is connected to target build and build is connected to the desired environment.
Run test scenarios to ensure the flow works as expected.
Use [Observability](/observability/overview) tools to track flow performance.
Check [execution logs](/observability/logs) for any issues or errors.
### Performance monitoring
* **Execution success rate**: Track how often flows complete successfully
* **Response times**: Monitor flow execution duration
* **Error rates**: Identify common failure points. Work on prompt or changing models.
* **Resource usage**: Track token consumption and API calls
## Best practices
### Version management
* **Descriptive notes**: Always provide clear, actionable version descriptions
* **Incremental changes**: Make small, focused changes rather than large overhauls
* **Testing**: Thoroughly test flows before publishing to production
* **Rollback plan**: Keep previous versions available for quick rollback
### Security considerations
* **Access control**: Regularly review who has publishing permissions
* **Environment isolation**: Maintain strict separation between environments
* **Audit trails**: Monitor all publishing activities for compliance
* **Secret management**: Ensure sensitive data is properly secured
### Performance optimization
* **Efficient flows**: Design flows for optimal performance and resource usage
* **Monitoring**: Set up alerts for performance degradation
* **Scaling**: Plan for increased load and usage patterns
* **Optimization**: Continuously optimize based on performance data
## Expose as an A2A agent (Agent Registry)
After you publish an agent graph, you can register it in the **[Agent Registry](/agent-registry/overview)** so other systems and agents can call it over the **A2A protocol**.
Complete validation and publish at least one version to your target environment. Unpublished graphs cannot be exposed.
In Graph Studio (local/dev environments), click **Configure Agent** in the canvas header, then **Create New Build** in the Expose modal.
Fill in Agent Build Config, optional export settings, and the **Agent Card** (skills, tags, visibility). Submit with **Attach Agent Card**.
New builds start as **test**. Promote to **live** from **[Agent Cards](/agent-registry/agent-cards)** when production routing is approved.
Full wizard details: **[Expose your agent graph](/agent-registry/expose-your-flow)**. Hosted URL patterns: **[Endpoints & lifecycle](/agent-registry/endpoints-and-lifecycle)**.
## Integration with other components
### Assistant integration
* [**Conversational Assistants**](/assistants/conversational): Deploy flows for chat and voice interactions
* [**Email Assistants**](/assistants/email): Publish flows for email automation
* [**Autonomous Assistants**](/assistants/autonomous): Deploy background automation flows
### Observability integration
* [**Execution Logs**](/observability/logs): Monitor published flow performance
* [**Usage Metrics**](/observability/usage-metrics): Track flow usage and performance
* [**Error Tracking**](/support/error-codes): Identify and resolve issues
### Environment management
* [**Build Configuration**](/builds/configuration): Configure deployment settings
* [**Lifecycle**](/builds/lifecycle): Recommended testing and deployment flow